Simple Scheduled Netlify Deploy
Hugo PublishDate
The Hugo static site generator has the feature that you
can mark a post as being published at a certain date in the future. When hugo
generates the website, it will not generate that post’s page if the date is
still in the future. This is done by setting the publishDate variable in the
post’s front matter to the date you want it published.
Netlify auto-deploy
Netlify will automatically regenerate your website using hugo everytime there is a commit to the master branch1.
But if the publishDate is in the future, then the page will not get rendered.
And when the date arrives, Netlify will not regenerate unless either a new
commit happens, or it is kicked off manually from the Control Panel.
What would be nice is a way to kick off a deploy on a regular schedule to pick up newly published content.
Solution Architecture
Netlify supports webhooks - a URL that results in an action. In particular you can ask netlify to respond to a webhook by regenerating and publishing your site.
Google Cloud Scheduler can schedule a job that will send a POST request to a supplied URL.
Problem solved.
Yes, Google Cloud can cost money. But the free tier actually covers quite a bit. So unless you go crazy with the scheduling, you will most likely not wind up with a bill.
Setting up Netlify
I’m going to assume you already have a site up and running correctly on Netlify. The only thing left to do is to configure the webhook.
Go to your site’s settings panel. Under “Build & deploy” you will see the “Build hooks” widget.

This widget will list all of your defined webhooks, allow you to delete webhooks, and add a new webhook.
When you press the Add build hook button, the widget will open the panel to
allow you to give a name to the webhook and specify which branch to build.
Press save and you’re done. Make note of the URL. That will be needed when we
create the Scheduler entry.
Set up Google Cloud Scheduler
This will take a bit more to do. I’m going to assume you already have a Google Cloud account. If not, you can head over to the Getting Started page to activate the free trial.
Create the project
First you will need to create a project (or select one you already have) in the Project Selector.
Create the Job
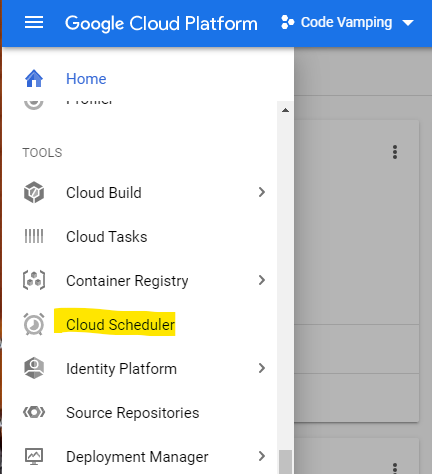
Once you have done that and the console for the project opens, open up the “hamburger menu” in the upper left hand corner. Scroll down until you see “Cloud Scheduler” and select it.

A panel will appear with the option to “Create Job”. Select it.
When you do so, it will ask you what region you want to use. It normally does a good job picking something reasonable, so, just take what it offers unless you have a strong reason to do otherwise.
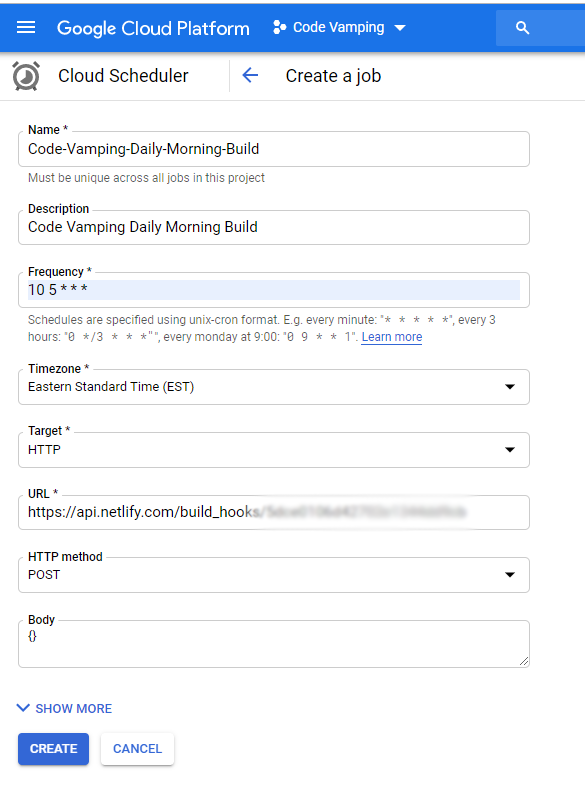
GCP will do some behind the scenes set up and then present you with the page to define the parameters of the new job.

Be sure to set Target to HTTP and URL to the URL from the build hook you created over in Netlify.
The Frequency field follow the tried and true (but confusing) unix cron standard. The documentation link near the field does a good job of explaining it. The setting you see in the screen shot says to run the job each day at 5:10 am.
After you select “Create” at the bottom, you will see the list of jobs in your project - including the one you just created.

And thats it!
To test, press the “Run Now” button to the far right. Look at the logs to be sure things worked. Theny you can head over to Netlify and check that a deploy happened. It will be labelled as having come from the build hook.
Further Thoughts
This isn’t perfect. Since it builds on fixed schedule, it will build even if there is nothing to do.
Also, since it simply rebuilds the version that has already been commited, you must commit to the tip of master (and go through a rebuild) even if all the pending posts are in the future.
Netlify has put togther a solution that uses AWS Lambda function to schedule the merge of a pull request. This has the advantage of working with any static site generator.
The bad side is that - unless you are very displined about your branches - you will end up with merge conflicts - or - you will need to merge branches to get configuration changes.
I’ve been thinking through a solution that would use a script to walk through your hugo posts a build a schedule for future dated posts and then use the google cloud SDK CLI to schedule jobs accordingly.
Hoefully this has been helpful.
Yes, you can set the branch - and the tool (e.g. Jekyll). ↩︎
